|
|
Home | ||||||||||||||
|
|
Tatting | ||||||||||||||
|
|||||||||||||||
|
|
About me | ||||||||||||||
|
|
About Dreams of Lace | ||||||||||||||
|
|
|
10.10.2003 © 1998 Christiane Eichler All rights reserved. |
Needletatting tried by a shuttle tatter
As I'm writing this the compilation is not yet finished.
![]()
Some time ago a friend gave me a set of tatting needles, which were accompanied by some meagre instructions. Of course I tried the needles out, and found the instructions more than difficult to follow, and the outcome using normal crochet cotton was everything but what I loved. The following photo shows my first example. It was worked with no. 20 crochet cotton, a number 5 needle, and a double core thread.

On the other hand I thought there must be a reason for the technique to exist, so I decided to give it a second chance before discarding it. I ordered the two needle tatting books by Barbara Foster, which I can greatly recommend to anyone who tries this out.
0. Abstract
Needle tatting is a variety of tatting that is worked with a needle instead of a shuttle. The way of working is different than shuttle tatting, especially since knots are not transferred from one thread to the other. The outcome looks almost the same as shuttle tatting, depending on thread/needle size. I have found needle tatting to be not inferior in any way compared to needle tatting. It is possible to do every technique I know about with the needle. Some techniques are easier to do with the needle, others are more difficult. Needle tatting is fast to learn, and especially suited for yarn and threads that are difficult to work with a shuttle.For normal tatting with crochet cotton and other tightly plied cotton, linnen or silk threads I prefer to work with the shuttle, because the tatted items are crisper, and flatter than when worked with a needle. When you want to work the mentioned kinds of threads with a needle, you have only a small selection you can use without the tatting looking chunky.
But for thread that is difficult to handle with a shuttle (like yarn, stretchy threads, fluffy materials) the needle is very well suited.
This document contains descriptions of my experiments with photos of the tatted items, and conclusions from the experiments for the practical usage of needle tatting. Some of the more difficult techniques are described by working instructions for a small sample piece.
1. The first experiment: Tatting and shuttle tatting with cotton thread and wool yarn compared
At first I chose my threads from the guide in Barbara Fosters Books. Size 20 thread is a rather standard size for tatting, and it was recommended for the no. 5 needle. I used a no. 8 pearl cotton by Anchor instead and got the same crude result as when I had tried out the needles earlier. Then I used pearl cotton no. 5 with the same needle, and I liked what I saw some more.
This got me into experimenting mode. I tatted the medallion from book 2 first with a needle and no. 5 pearl cotton. Then I tatted the same medallion with the same thread, but using a shuttle. I compared the two: medallion 1 was only slightly bigger than no. 2. The stitches themselves are chunkier on the needle tatting. This is because the needle does not give, and has to be slightly larger than the thread you use. So you don't have the same tightness in knots as when using the shuttle. The whole appearence is much crisper when using the shuttle. The medallion feels much softer when tatted with the needle.
The second experiment followed, because I had formed the theory (even before I got the Foster books) that needle tatting might be better suited for yarn than for thread. (There are many knitters doing needle tatting with yarn to embellish their knitting, and they are very happy with the outcome.) So I took the largest needle (no. 3) and the finest yarn I had (recommended for knitting needles 2 1/2 (metric)) and again tatted the same medallion in two versions - one with the needle and one with the shuttle. The needle version was not as chunky as when I used thread. It felt nice working with it. It felt very smooth, bendable and fluffy when finished.
The shuttle version was much more difficult. Wool (I used a wool/acrylics blend) is much more stretchable and squeezable than cotton thread. You have to watch your tension very close. I'm not someone who tats tightly, but I had trouble closing the rings. The yarn stretched so much that I feared it would break. I was very surprised when I compared both medallions: The shuttle medallion was considerably smaller than the needle tatted one (1 1/2 cm difference in diameter). The shuttle tatted one felt like cardboard rather than wool, and there was not much fluff seen. The shuttle tatted one was almost as small as the ones done with the smaller needle and with pearl cotton.
These are the medallions from my experiments:
 |
The medallions on the left are made with a shuttle, the ones on the right are made with a needle. The upper two are made from no. 5 pearl cotton, the lower two are made from yarn (75 % wool, 25 % acrylics). |
2. The second experiment: Using 5 yards of thread with needle or shuttle
The second experiment I made was comparing the two methods as to their use of thread. I used the method described in Foster's Book 1, and made a small edging of rings only (5-5-5-5) from a 5 yards length of no. 80 tatting cotton. Using the no 7 needle I made 29 rings, which made 21 cm of edging. Then I wound 5 yards of the same thread onto a shuttle. I got 38 rings from it, which made 22.5 cm of edging. The comparatively small difference in length comes from the longer picots I did in needle tatting. The following photo shows a close-up of both edgings. Upper edging: shuttle tatting, lower edging: needle tatting.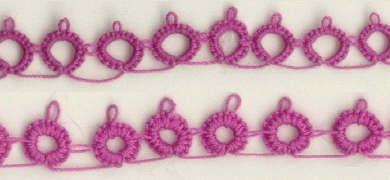
On this photo you can clearly see the difference between needle and shuttle tatting when using thread. The overall appearance of the rings in needle tatting is chunkier (in this example the effect is extreme, because thread and needle aren't matched well). The "legs" of each stitch are longer than in shuttle tatting, which makes the ring appear thicker. The longer "legs" are also the reason why this technique uses slightly more thread than shuttle tatting. This effect is less visible when a better matched thread/needle combination is used.
3. The third experiment: Using a shuttle tatting pattern (medium difficulty) to work needle tatting
The second stage of experimenting lead me to try out the possibilities of needle tatting. The second aim was to get some experience in working with the needle to be able to see more differences. The following photo shows a small doily worked with no. 30 thread, no. 7 needle (a very good match, but a bit difficult to thread the needle). The pattern is from Naumer, p. 36, pattern #10.
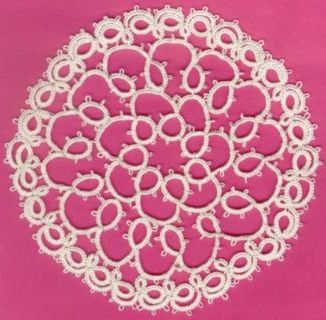
Working a pattern from a shuttle tatting book was no problem at all. What has sure helped me was my experience in shuttle tatting, so I knew which motions of both techniques are equivalent. You work your rings and chains like you are used to with your needle, making stitches, picots and joins as are noted in the pattern. For simple rings and chains patterns ignore any hints about "reversing work."
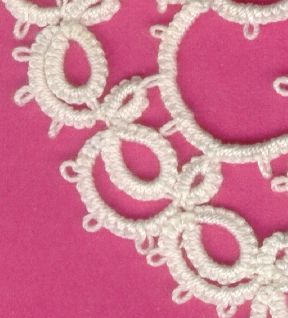
The result is not much different from a shuttle tatted piece. It was more difficult however to maintain the right tension of the core thread for chains and rings as well. This is because due to the needle being slightly thicker than the thread there is less friction between core thread and stitches. Hence the tension of the core thread is more difficult to manipulate. You have to watch your tension while you make the first few stitches of the next ring or chain, because it is easy to change the tension of the previous element by tugging at the core thread. You will see the problem in the following photo, which is an enlarged detail of the previous photo. You will see the problem especially in the chains, but have a look at the small rings, too.
4. The most important techniques of shuttle tatting made with a needle
After those initial experiments I wanted to try all the important techniques used in tatting today. Several people of the Arachne Lace list helped me generously with information, where my own sources or my imagination wouldn't help. I usually made small tryouts, which I will describe in detail so they can be worked by other people as well. I didn't get to try out all known techniques, so there is still some research left to do.I covered the following techniques: picots, joins, shuttle joins, split rings, floating rings on both chains and rings, two-colored tatting, reverse stitch (lark's head knot) combined with tatting stitch in the same chain. Techniques that still need research are: Cluny tatting, split chains, creative tatting (Helma Siepmann), pearl tatting, roll stitch (should be manageable), Ann Dyer's techniques, tatted picots (a technique introduced by Ann Orr and rediscovered by Teri Dusenbury). If you have tried to emulate any of these techniques with a needle, please tell me what you found out.
While working I found out that some of the techniques are easier to do in shuttle technique, while others are easier to do with a needle.
4.1. Picots
Picots are easy enough to do in needle tatting, just leaving an unworked piece of thread between two stitches like you do in shuttle tatting. There is one problem connected with picots in needle tatting however: It is very easy to pull a picot longer after the needle is removed from a ring/chain. The cause for this is again the fact that the stitches are not as tightly wrapping the core thread due to the needle being larger than the thread. If you tug on a picot (e. g. when doing a join) you will pull out the adjoining half stitches until the thread sits tightly on the core thread. Pulling out stitches may be convenient, if you have a short one and want to make it the same size as your other picots. But when you do a join you have to be careful not to pull out the picot, as well as when blocking your work.
While this effect is possible in shuttle tatting, too, much more pulling is needed to get the effect, and the amount of thread which can be pulled out is smaller. In shuttle tatting you can usually pull out about one thread width, while in needle tatting you can pull out 3-5 thread widths.
4.2 Joins
In needle tatting you can do two kinds of normal joins. The first is the same as in shuttle tatting, and is described in Barbara Foster's book set. With the tip of the needle you pull a loop of the working through the joining picot, put the loop on the needle, and depending on your technique work the next stitch, or only the second half of the stitch.
The other method is unique to needle tatting. You can just stick the needle through the picot and work on with your stitches. This method is of course very fast and easy to do. What I don't like is the look of the join in the tatted piece, but this is my personal preference. It looks as if the joining ring is stuck through the picot. You can see this very clearly on the follwing photo, which shows an enlarged section of the small doily from chapter 3.
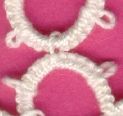
The join looks very loose, which it isnt, because on the back side the picot is caught between the working and the core threads of the adjoining ring.
4.3 "Shuttle" joins
Shuttle joins are easy to do with the needle. Again you have two options: just sticking the needle through the picot, or pulling a loop of the needle thread through the picot. I used it on the following medallion, which is the medallion of Foster's book 2 to which I added a second row of chains only: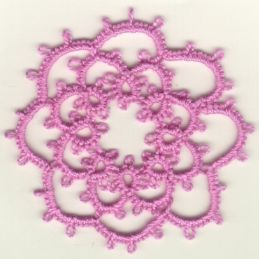 | Worked with Anchor Pearl Cotton No. 5, col 93. |
Split rings
Since I love the design possibilities of split rings, and since it is an advanced technique, which is more and more used in modern tatting, I found it very important to find out whether these are possible to do in needle tatting. The following photo shows a sequence of split rings worked with the needle.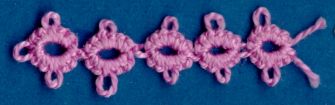 | Worked with Anchor Pearl Cotton No. 5, col 93. |
I also did some more complicated patterns involving split rings and didn't encounter any problems. Due to the designer not wanting a photo of my tryout piece to appear on my page I unfortunately can't tell you much more about this.
![]()
top of page | home | tatting