|
|
Home | ||||||||||||||||
|
|
Tatting | ||||||||||||||||
|
|||||||||||||||||
|
|
About me | ||||||||||||||||
|
|
About Dreams of Lace | ||||||||||||||||
|
|
|
10.10.2003 © 1998 Christiane Eichler All rights reserved. |
Tatting Square Rings
I picked up this technique from Anne Dyer's book "To Boldly Go Where No Shuttle Has Gone Before - Tatting Definitely Not For Beginners." I can thoroughly recommend this book to anyone who is interested in new tatting techniques - she has a wealth of them. When I was attending the Horstmar Tatting Exhibition I demonstrated the technique to some people and soon had lots of people surrounding me wanting to see what I did. When I mentioned this on the tatting lists I got several pleas for describing it. I'll do that here on my page since it is easier to show with photos.
The technique is not difficult to do, if you have the following:
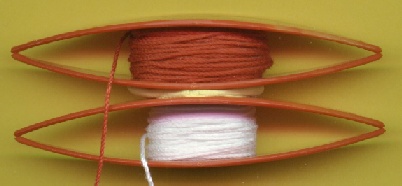
- Two shuttles (preferably ones with bobbins), one of them wound with white thread, one with red thread (or color of your choice)
- a white ball thread (all threads should be of size 10 so you see what you're doing)
- A little lumb of Blue Tack, a removable adhesive kind of plasticine (my one is actually yellow, and has the UHU brand) - got this tip from David Downunder from Arachne some time ago
- a quiet hour for you and your shuttles
Make an overhand knot with all thread ends. This helps you to hold everything.
Step 1: You start a ring with the white shuttle thread in the normal way, but don't do a knot yet. Now stick the two shuttles together with the Blue Tack. This should look like this:
You work with two shuttle threads, but only the white thread is on the left hand (ring thread). Work 4 ds.
Tips:
- Use the ring thread to adjust the lengths of both shuttle threads so they are the same.
- Start with as long a ring thread as you can possibly get. Two shuttles need lots of space.
- If you have to elongate the ring thread only unwind the white shuttle.
- Stick the shuttles together so that the threads are coming out at the same place (I use back and away from me).
- When you seperate the shuttles see to it the Tack stays on the red shuttle, not on the white one.
Step 2: Now seperate the shuttles and use only the white one. Work 1 ds, p, 1 ds.
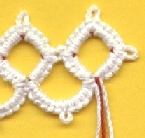
Step 3: Stick the shuttles together again, and make 4 ds with both shuttles. What you have worked now will look like the last ring in the following photo, only with a picot instead of the join.
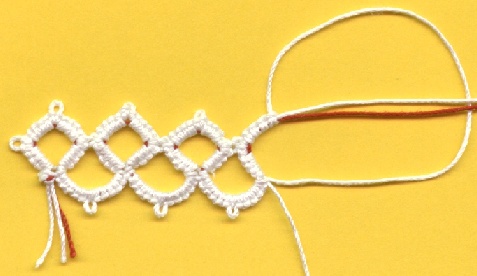
Now reapeat steps 2 and 3 for two more times. Your ring should now look like the last ring in the following photo:
Notice the red thread being inside the stitches for four ds, and being outside the stitches for 2 ds.
Step 4: Close the ring by tugging on the white thread only. You should now see a round ring with some red blobs like this:
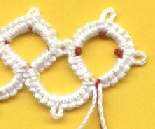
Step 5: Tug at the red thread to get the corners looking like this:
You see that the red thread is almost invisible. On the blown up photo below you can still see the red thread inside the corners.

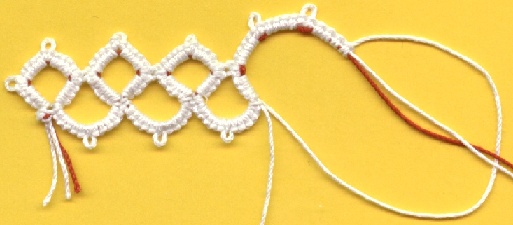
Now reverse work in the normal manner. Stick the shuttles together again, and with both work 6 ds, p, 6 ds. Reverse work.
Now you can go on with the next square ring. To get this little edging just join to the last picot of previous ring instead of doing the first picot.
Some observations:
- You have three blobs of red on your ring before you close, one less than you have corners. The last corner is made by the base of the ring.
- The red thread is only carried along inside the stitches of rings and chains. You can use the red thread as ball thread for the chains, but it doesn't lie as flat as when you use a seperate thread for the chains.
- You can use finer thread for the red thread if you want to. This makes the lines less bulky.
- If you are using this technique later on you will want to have both shuttle threads of the same color. That way the second thread inside the stitches will be almost invisible. If you can, use differently colored shuttles to make sure you can tell them apart. I only used red and white for the tryout piece so it was easier to see what was going on.
- Do not tug the ring too close. If you do so the sides of the square will curve.
- You need at least two stitches for the corners. For a sharp turn you can use three stitches.
- You can now vary this pattern to suit your needs: Add/eliminate picots, make some sides longer than others, make a triangle, hexagon or whatever.
Have fun playing with this!

top of page | home | tatting