|
|
Home | ||||||||||||||
|
|
Tatting | ||||||||||||||
|
|||||||||||||||
|
|
About me | ||||||||||||||
|
|
About Dreams of Lace | ||||||||||||||
|
|
|
10.10.2003 © 2002 Christiane Eichler All rights reserved. |
Easter Eggs
All eggs were worked in Spring 2002. They were worked for a Spring Crafts show in Bochum/Germany. I include instructions for how to make them. If I didn't mention thread size I used no. 10 crochet thread or no. 5 pearl cotton (these sizes can be even mixed). All eggs are emptied real chicken eggs in different sizes and natural colors.
"Children's Flowers" | "Shrub" | "Tiny Flowers" | "Chain" | "Daisy Chain"![]()
egg with simple flower |
egg with simple flower |
egg with simple flower | |
small egg with simple flower |
Egg "Children's Flowers": These eggs with the naive children's flowers are fast projects. You can combine any color you want, these are only a few examples. I didn't make two eggs that were identical. You work a Kreative flower (Helma Siepmann) using Jk 14, 6 Petals, then for the Stem about 14 reverse stitches (rs) (green over the other two colors), work a Ring in green 5-5, then rs 5 or 6 (green over the other two colors). Last knot is a creative knot. Work two flowers, one for front and one for back. The Frame is a chain of split rings (8-8), for my eggs 12 - 14 rings was ok. Work the frame to be tight rather than slacky. The very small chicken eggs only have two flowers.All the pieces are then glued to the eggs. Start with the "frame". The frame only needs a few dots of glue. I use Gutermann Textile Glue for that purpose. Put a bit of glue on a piece of paper. Use a toothpick to apply small amounts of glue to the tatting. For the flowers only a few dots of glue are enough. Cut threads shortly before you glue the pieces into place. If you apply glue in the wrong place you can easily rub it off the egg with your finger while the glue is still wet. | ||
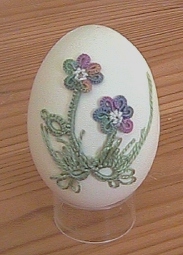
egg with shrub and grass |
Egg with shrub and grass: Manuela Nr. 20 und pearl cotton 8: Start out like the simple flowers and work the leaf. The next part of the stem is rs 14, then 2 ground leaves made from rings. These rings have many (10 to 12) long picots of different length in the part that will be up later. Second part of these rings is 6 to 8 dk, no picots. Now work a stem of 14 rs, and a second flower. The shrub is formed while glueing it to the egg. Cut a few of the longest picots. When glueing the shrub use a tiny amount of glue to fix the end of the cut picots. Hide thread ends under the flowers. You can really play with color doing these shrubs, it is so easy and so much fun. | ||
egg with lots of tiny flowers |
Egg with lots of tiny flowers: This one is for beginners! Use three different colors (I used yellow, pink and pale green) and make 4 flowers of each color. Each flower is just a ring with lots of picots and a dk between all picots. Make the picots a little longer than usual, uniformity is not necessary. Each ring has 5 to 7 picots. Cut threads very close to flower, but put on a dot of glue at once, otherwise the ring might unravel. Now you can glue the flowers to the egg. A great way to empty a shuttle without wasting thread! |
egg "Chain" |
egg "Chain" |
egg "Chain" (6 chains) |
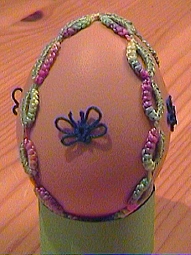
egg "Chain" with butterflies |
Egg "Chain": These are made using split rings, either one or two colors. Don't work the ends in, you will need them to knot the chains around the egg. It is important to work the rings of a size that will give you an even number of rings around the egg. For my eggs and my tension I used 14 rings 8-8 (thread no. 10) to go around the egg once. Start out with 21 rings (1 1/2 times around the egg), then put the chain between both shuttles, so that the threads cross the chain between 7. and 8. Ring. Now work 7 more rings. Now put in the egg, the crossing of the chains on top of the egg. Knot everything so that you get a crossing at the bottom, too. Sew in ends. You don't need glue for this egg, because it sits snugly in its "cage". The tiny butterflies on one egg are simple rings: 1-1---1-1---1-1. Cut the middle picot to get antennae. I glued the butterflies on *after* working the chain "cage". Again this pattern is ideal for playing with colors. The egg with six chains is a bit tricky to describe, showing would be much easier than trying to describe it. For the more experienced tatter I think it is enough to say that instead of crossing the chain I join to it - once coming from one side, once coming from the other. First join is after 21 rings joining to the picot between rings 7 and 8, then another 14 rings, join to the same place, but coming from the other side, then work another 7 rings. Put in the egg. Again knot everything together, so that the crossing on the bottom looks like the one on the top. |
egg "Daisy Chain" |
Egg "Daisy Chain": Again something for beginners, working with one shuttle only. You can use every kind of thread, I used no. 80, which is available in lots of colors, solids as well as variegateds. Again you work picot rings with 5 to 7 picots, and leave an unworked piece of thread of 1 - 2". Don't work too regularly! This daisy chain is now glued around the eggs in spirals, which can cross each other. This is good work while sitting at the TV or chatting with people demonstrating tatting - not much counting, no need for "correctness.". |


![]()