|
|
Home | ||||||||||||||
|
|
Tatting | ||||||||||||||
|
|||||||||||||||
|
|
About me | ||||||||||||||
|
|
About Dreams of Lace | ||||||||||||||
|
|
|
10.10.2003 © 1997 Christiane Eichler All rights reserved. |
Christmas ball Sun
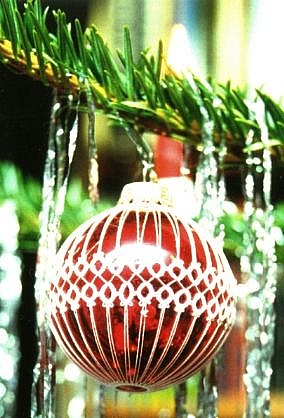 |
You will need: Making the Lace
Alle Rings are made in the same way: 6 ds, j (p for first and second ring), 5 ds, 3 p sep by 1 ds, 5 ds, p (j for last 2 rings), 6 ds
|
| How to assemble the ornament Work two seperate rings with the shuttle. The first ring has 31 p sep by 3 ds. This ring is placed around the hanger. The second ring has 31 p again, but sep by 2 ds. Put this ring aside until you need it. Thread your needle with a piece of crochet cotton about 1 1/2 yards long. Knot the end to one p of the big ring which is placed around the hanger. Pull the lace over the ball (use photo for orientation). Use some sticky tape to fix the lace in place. Don't tape any picots facing the big ring. Now insert the needle in any middle picot of the lace next to the big ring, pull thread through the picot (don't tug too hard). Please insert needle either from under or over the lace, but not from two directions. Insert the needle to the next picot of the big ring, then back to the lace and so on until you have picked up every picot of the big ring, and every middle picot of the lace facing the big ring. After picking up all picots with the needle you tug at the thread, beginning from the knot and working your way towards the needle and gently apply some tension to the thread. You will be astonished at how much thread you will be able to pull. Make sure the tension is even and the picots are all in a strainght line. Don't yet knot the ends, but just unthread the needle Now you take the second big ring and tape it to the lower "pole" of the ball. Now retape the lace, so that the picots facing the lower big ring are free. Thread your needle like before using a new length of thread, knot to a picot of the lower big ring and insert needle in the same way through picots of the lace and the big ring as discribed above. When all picots are done again tug from the knot towards the needle, and apply gentle tension to the thread. Remove the tapes. Now you can adjust the position of the lace by applying some more tension to both threads. When you are satisfied with tension of threads and position of lace you can knot both threads near each big ring. Use a double reef knot and clip ends. It is not possible to hide the ends in the tatting, so just make sure they are close to the picots of the big rings. This pattern can be adapted to every size of ball and thread. Just make a length of lace that loosely fits over the middle of the ball, count the rings on one side, and make the big rings with that number of picots. Maybe you will need to make 4 ds between the stitches to accomodate an extra large circumference of hanger. |